Friday, November 19, 2010

The Most Misunderstood Vegetable

I haven’t been posting lately, but I’ve definitely been eating. And fall meals are so delicious. It might be my favorite eating season. We’ve been feasting on Roasted Pumpkin Penne with Autumn Pesto, Butternut Squash Risotto with Pancetta, Eggplant “Meatballs” with Arugula and Shaved Fennel Salad. And Trevor has been making his own salad mix with numerous spicy winter greens.

The fall vegetable from Persephone Farm that we’ve been enjoying the most is one that many people hate: Brussels sprouts. When I posted on Facebook about the delectable Brussels sprouts we’d had for dinner, I got a firestorm of responses. A few people could not believe we found them tasty. But most of my friends professed their love for the cruciferous vegetable.

I think they’ve gotten a bad rap because if they are overcooked they can be downright hideous. I actually never ate them growing up because my mom hated them! I only tried them a few years ago when Trevor brought home a big stalk after his shift at the Farmers’ Market. But treated right, they are splendid!

We followed a recipe from Sheila Lukins and Julee Rosso’s New Basics cookbook. It called for the leaves to be pulled from the Brussels sprouts and lightly sautéed in butter, olive oil and thyme. We’ve found that quartering the sprouts and cutting out the core saves a lot of time and lets plenty of leaves get separated. Which means some of the leaves get a little crispy and brown, and that's the best part.

Other suggestions: Roast in the oven with olive oil, sautée with garlic, crisp up some pancetta then sauté leaves in drippings and add crumbled pancetta to each serving.
Of course, other parts of the meal are important. With my Brussels sprouts I made, a Pancetta Wrapped Pork Roast from a Martha Stewart recipe and some roasted acorn squash also from Persephone Farm. It so good, I made the same meal again a few weeks later for my friend Maureen’s birthday.

So if you have shunned Brussels sprouts in the past, I say put aside old prejudices and give them a second chance. You might discover your new favorite vegetable.

Links:
Pancetta Wrapped Pork Roast

Tuesday, September 28, 2010

Saving up for Winter

Spiced Apple Butter, Pickled Beets, Dilly Beans!, B&B Pickles

So I feel like a squirrel. But in a good way.

Trevor and I have made our third attempt at canning and are finally seeing some success. In our prior attempts, we used recipes from cookbooks not specifically about canning and preserving. After our neighbors offered us all the apples we could pick from their tree and we realized the apple tree in our backyard was also producing, we didn’t want the apple windfall going to waste. So I started looking for a good canning book.

I browsed through several canning books online and read a few recommendations from The Oregonian. Then I went to the bookstore and decided on purchasing Canning for a New Generation: Bold, Fresh Flavors for the Modern Pantry by Liana Krissoff. What I liked most about the book was that it doesn’t scare the reader away by making home canning this scary, arduous process. Some books made it seem as if you needed a laboratory and science degree to can safely. I felt that if people have been canning for generations, then it must be safe otherwise people would stop doing it.

Also, the author has a sense of humor. And it’s beautifully photographed and packed with recipes for every season that I couldn’t wait to try.

We started off making Spiced Apple Butter. After reading the book carefully, I realized I needed some sort of strainer or food mill. The Squeezo strainer recommended by the author cost about $200. So that was out. Then I remembered that there was a fruit and vegetable attachment for my Kitchen Aid mixer that I didn’t have, but it worked with the food grinder attachment I did have. And it was around $50. It meant I didn’t have to peel and core six pounds of apples. Sold!

I followed the slow-cooker method for making the apple butter and it worked perfectly. When Trevor came home from work the apple butter was ready for canning. It’s much easier to can with two people. We finished up pretty quickly thinking, “That wasn’t too hard!”

The following weekend Trevor wanted to make Honeyed Bread-and-butter Pickles, Dilly Beans! and Pickled Beets. He brought home Persephone pickling cukes, dill, green beans and beets after his shift at the farmers’ market. Then we got to work.
2nd round: pickled beets & carrots
The pickles and beans turned out perfectly. The Dilly Beans! are my new favorite snack. I used to buy olives from the olive bar at my Fred Meyer to nibble on while making dinner. The Dilly Beans! have taken their place. Along with the Spicy Carrot Pickles we made the following week.

We did mess up our first batch of beets though. We were both working on the brine, (the hot, salty vinegar mixture that’s poured over vegetables to pickle and preserve them) and neither one of us added the water the recipe called for. That makes for very vinegary beets. We did a do-over and they should be fine.

What we learned from Canning for a New Generation and pickling our own vegetables is that we have some freedom with changing the spices if we keep the brine the same. We will be making many more recipes from this book. Also, it’s very satisfying to see the beautiful glass jars lined up on the shelf. That’s what I mean by I feel like a squirrel. Come February when fresh green beans are a distant memory, I’ll be able to pop open a jar of Dilly Beans! and crunch into a wonderfully preserved memory of summer.


Friday, September 17, 2010

Fennel Pie

Last night I had planned on making a Caprese pasta with fresh tomatoes from our garden. But since we’ haven’t had too much sun this week, I didn’t have enough ripe tomatoes to harvest. So I rooted around the fridge to figure out what else I could make. I had fennel, kale, zucchini, feta cheese, fresh mozzarella and a little bit of onion. I realized I could make the Moosewood New Classics Fennel Quiche with some sautéed kale on the side. Perfect.

This meal was a little more work than I felt like doing, but it wasn’t too arduous. The most time-consuming part was making a piecrust. But I used a trick I’d just seen on the cooking show Ciao Italia. Grate frozen butter on a regular cheese grater and then mix it into your flour. Since keeping the dough cold is the key to flakey crust, this struck me as an excellent idea. Also, I buy butter in bulk and always store it in the freezer. And it worked out perfectly. The dough felt cold to the touch as I rolled it out on a piece of parchment paper.

The Moosewood recipe called for sautéing the fennel, onion, tomato and zucchini before putting it on the piecrust. And you make rich custard from feta cheese, tomato juice and eggs in a blender. Then you top the veggies with cheese, pour over the custard and bake. It smells heavenly while cooking. And makes a tasty lunch, or even breakfast, the next day. Plus it was a great use of Persephone Farm fennel, eggs, onion, zucchini and kale.

Links:

Monday, September 13, 2010

Slow-simmered pork

When the weather starts getting cooler, I happily get reacquainted with my old friend the slow cooker. And after Trevor brought home a couple of pounds of tomatillos, cilantro and several onions after working at the Persephone Farm stand at the PSU Farmers’ Market, I couldn’t wait to make chile verde.

Chile verde is home-style Mexican cooking at its best. It’s versatile — eat it as a stew, wrap it up in a flour tortilla, or make enchiladas with the leftovers. It’s filling and comforting — the pork falls apart when touched with a fork. And it’s healthy — a serving is a moderate amount of lean pork swimming in a sea of vegetables. Serve it with corn or flour tortillas, homemade gorditas or even with some Spanish fried rice.

Slow Cooker Chile Verde
Serves 6 to 8
I adapted this recipe from a Cooking Light recipe. I like to use a mix of Anaheim and poblano chiles. Sometimes the chiles are hotter than other times, but this dish isn’t supposed to very spicy. You can also make this on the stovetop, so I included a link to the original version below.

2 tablespoon canola oil
2 (1-pound) pork tenderloins or pork sirloin roast, trimmed and cut into 1-inch cubes
1 ½ teaspoons salt
¼ teaspoon freshly ground pepper
¼ cup all-purpose flour
¼ cup water
4 cups onion, chopped
2 pounds small tomatillos, husks and stems removed and quartered
1 pound fresh Anaheim or poblano chiles (about 4 medium), cut into 1-inch pieces
6 garlic cloves, chopped
1 ½ cups chicken or vegetable stock
1 cup fresh cilantro, chopped
1 ½ teaspoons ground cumin
1 teaspoon dried oregano
2 tablespoons flour
¼ cup water

Heat oil in a large skillet over medium-high heat. Sprinkle the pork evenly with salt and pepper. Place flour in a large zip-top plastic bag. Add pork to bag; seal. Shake to coat. Add pork to pan, and sauté 5 minutes, browning on all sides. This may need to be done in batches. Add more oil if necessary. Remove pork from the pan and place in a slow cooker. Add ¼ cup water to the hot skillet to deglaze it. Use a wooden spoon to loosen all the browned bits stuck to the bottom. Add water and browned bits to slow cooker.

Add onions, tomatillos, chiles, garlic, chicken stock, cilantro, cumin and oregano to the slow cooker. Stir to combine ingredients. Cover and cook for desired amount of time. (I usually cook on the high setting for 4 to 5 hours, but you can use the low setting and cook for 8 to 10 hours.) 1 hour before chile is finished cooking, use a fork to mix together 2 tablespoons flour and ¼ cup water. Mix until there are not any lumps. Add mixture to slow cooker and stir. Cover and let cook for remaining hour. Taste chile verde and add salt and ground black pepper as needed. Enjoy!

Links:
Chile Verde
http://find.myrecipes.com/recipes/recipefinder.dyn?action=displayRecipe&recipe_id=1054864

Thursday, September 2, 2010

Dancing Ravioli


Several years ago when I was living in California, I was at a party in which one of the hosts started making fried ravioli late into the night. He was dancing around while breading up the ravioli and deep-frying them. He wasn’t someone who had the reputation of being a “ladies man”, but nevertheless he soon had a crowd of hungry girls dancing around the kitchen with him — and eating the crispy ravioli as soon as they were cool enough to handle.

I think that was the last time I’d indulged in deep-fried ravioli goodness. So when I saw a recipe in Cooking Light magazine for Quick Crisp Ravioli with Roasted Tomato Sauce, I wondered if this version could match my memory of the decidedly "unlight" version.

And I have to say, the light version met that same incredible combination of crunchy breading and oozing, melted-cheese filling I remembered. For the sauce we used two pints of super sweet Sungold tomatoes straight from our garden and Persephone Farm garlic. We added fresh basil to the sauce as well since it’s just going crazy in our garden right now. And the combo of fresh tomatoes and fresh basil is hard to beat.

The recipe called for refrigerated ravioli, but I had some frozen ravioli that I used instead. We just cooked them in boiling water before draining them and breading them. They worked out just fine.

This meal was cheap, fast and utterly delicious. Definitely a reason to dance around the kitchen.

Links:

Quick Crisp Ravioli with Roasted Tomato Sauce 

http://find.myrecipes.com/recipes/recipefinder.dyn?action=displayRecipe&recipe_id=2011033

Ravioli

Wednesday, August 25, 2010

For the Love of Old Bay


If you are from Maryland, as Trevor is, it is a requirement that you love Old Bay. This salty, spicy seasoning is most recognizably paired with crab, but it can add some kick to other dishes, too.

Trevor recently found a recipe for Tilghman Island Stew in our Moosewood New Classics cookbook and decided we needed to make it. Tilghman Island is in the Chesapeake Bay. And not surprisingly, the recipe called for 2 tablespoons of Old Bay Seasoning.

And also not surprisingly, this veggie-packed stew was delicious. It called for eight different vegetables. We used Persephone Farm zucchini, kale and green beans. It’s one of those meals that makes you feel good after eating it.

We rounded out the stew with homemade cornbread. I’ve used the Albers recipe from the side of the box for as long as I can remember. And it’s always good. I’ve tried other recipes with diced peppers or fresh corn, but I think this recipe stands out in its simplicity. All you need with it is a pat of butter.

We loved this Chesapeake Bay-inspired meal. It’s one we will be making again soon while the zucchini and green beans are still in season. And it goes to show you can take the boy out of Maryland, but you’ll never take away his love for Old Bay.

P.S. Thanks to my mom for the beautiful quilted table runner she made for us that's in the first photo.

Links:
Old Bay Seasoning

Albers Cornbread recipe

Tuesday, July 27, 2010

Vegan, really?


OK, I love to eat meat. While I’ve flirted with the idea of vegetarianism, I’ve never been able to go fully meat free. Mainly, because I love cheeseburgers. But since reading In Defense of Food by Michael Pollan, I have cut the amount of meat I consume and make the effort to buy grass-fed beef or free-range chicken whenever possible.  (And by the way, homemade burgers made with grass-fed beef and a pinch of chopped sage are really, really good.)

Trevor recently read Omnivore’s Dilemma by Pollan, and made horrified gasps and exclamations as he was flipping the pages. And now he’s really determined to know exactly how the meat that makes it to his plate is being raised.

So to fit the more expensive (and humanely raised) meat into our budget, we eat less of it and more meals that are meat-free.  And now that Persephone Farm has more produce at the Saturday PSU Farmers’ Market, and Trevor is working the stand again, we’ve got a lot of ingredients to make fabulous vegetarian meals.

Last night we tried a new recipe from Cooking Light magazine’s July 2010 issue: Chickpea Bajane. We used Persephone garlic and spinach, and thyme from our own garden. Trevor insisted he didn’t really like quinoa, a slightly nutty grain, but once we started eating this meal, he decided he like this quinoa. The recipe is time-consuming, but not too hard. And it was so tasty it was hard to believe it was vegetarian, let alone vegan.


Links:
Chickpea Bajane 

Napkin by Rustbelt Fiberwerks   http://www.etsy.com/shop/rustbeltfiberwerks


Friday, July 16, 2010

Why I Love Trevor: Reason #62

He makes cherry pie. Do I need to elaborate? I guess I should say it is the best cherry pie in the world. The Hood River cherries were in full force at the Farmers’ Market last weekend, so Trevor bought enough for a pie.

The cherries were a glorious claret color. Their juice was so dark that after helping pit them, my nails were stained for a few days.

Trevor followed the Joy of Cooking for the filling and crust. But we made a slight swap in the filling. He used amaretto instead of almond extract and added a few squeezes of lemon since our cherries were sweet, not tart. When it comes to crust Trevor does not skimp on the fat and the result is worth it. The crust almost falls apart before you can get a bite into your mouth.

My parents were visiting Portland, so they were lucky enough to get some of Trevor’s pie. And they raved about the pie as much as I did. They still talk about a Concord grape pie he made several years ago. I have a feeling they’ll be talking about this cherry pie for years to come, too.

One a side note: I’ll be posting more about Persephone Farm produce in the coming weeks. Because of the heavy May and June rains, the crops couldn’t get planted at the usual time. That means not as much produce as normal for this time of year. But Trevor will be back at the stand in a few weeks and I’ll have more to write about. And, of course, eat.

Wednesday, June 2, 2010

Who's Crabby?

Dinner doesn’t get much simpler than homemade crab dip, sliced baguette and a lightly dressed green salad. That’s what Trevor and I had over the weekend. But if the crab is from Linda Brand Crab sold at the PSU Farmers’ Market and there’s a bottle of Veuve Clicquot, it’s a pretty remarkable dinner.

I didn’t think I liked crab until I tasted this dip. It’s our variation of Trevor’s mom’s recipe. If you want to make this dip truly decadent, use Jacobs Creamery cream cheese instead of the foil-wrapped block you’d find at the grocery store. The photo above shows a small serving of dip. And it’s in no way representative of the amount I actually ate! Try it and you’ll understand why.

Crab Dip
Serve with sliced baguette or crackers.

8 ounces cream cheese
a few dashes of Tabasco sauce
dash of Worcestershire sauce
¼ teaspoon Old Bay seasoning
1 tablespoon diced shallot
½ cup mayonnaise
1 teaspoon flour
12 ounces crab meat
Slivered almonds

Preheat oven to 325˚ F. Spray a glass pie plate or 8-inch square casserole dish with cooking spray.

Mix first seven ingredients together (cream cheese through flour). Gently fold the crab into the cream cheese mixture. Spread mixture into prepared pie plate. (It will only be 1 to 2 inches deep.) Sprinkle with almonds. Bake for 30 minutes.

Links:
Linda Brand Crab

Jacobs Creamery

Monday, May 17, 2010

Sausage in Salad?


On a recent trip to the Hillsdale Farmers’ Market, Trevor and I picked up some delicious German sausage from Sweet Briar Farms. Slathered with grainy mustard, they made excellent sausage sandwiches. I stuck the remaining two sausages in freezer.

Later in the week we were given some tender, red-speckled butter lettuce and tasty yellow-fleshed potatoes from our friend Paul who runs an amazing CSA program at a local high school. I knew we could make an excellent salad with these ingredients.

Trevor and I had prepared Cooking Light’s Chicken, Red Potato and Green Bean Salad many times before. It’s like a German Potato Salad on top of greens. And it’s dressed with a tangy whole-grain Dijon vinaigrette. But this time I decided we’d swap out the chicken for one of those Sweet Briar sausages we had tucked away. And it was phenomenal! The mustard in the vinaigrette was so good with the salty sausage.

It was a quick-to-prepare, hearty meal perfect for a warm evening. And the next morning, Trevor pan-fried some of the leftover cooked potatoes with a little dried rosemary. Then he topped them with poached eggs and sliced up sausage. The slightly runny yoke became a silky sauce when mixed with the hot potatoes. We first named it “German Farmhouse Breakfast,” then we decided we liked the name “Hausenfrites” even better. Either way, it was a keeper.

Links:

Sweet Briar Farms, Eugene, Ore.

Tuesday, May 4, 2010

Whaddya Do with Parsnips?

Portland has been keeping the weather weird. Rain, sun, thundershowers, hail, rainbows – all in a single day. And today’s high promises to be a record setter –  for the coldest May 4.

So the early spring we saw in March is long gone. And it’s time to get back to casseroles. Before Persephone Farms’ last day at the Farmers’ Market until July, Trevor brought home some potatoes, parsnips and rapini – a slightly bitter green. We used the root vegetables for one of our favorite recipes from the Moosewood New Classics cookbook, Potato Parsnip Gratin. This cheesy dish is perfect for cold winter – or spring – nights.

The trick to making this gratin is to slice the potatoes and parsnips as thinly as possible. You can use a mandoline or really sharp knife. Trevor does a much better job of making really thin slices than I do with his Victorinox /Forschner Chef’s knife. We’re always fighting over who gets to use that knife.

The other trick is adding about 1 cup of cubed ham steak to the gratin. It’s not needed, but it sure is good!

This recipe also calls for thyme, which we have in our herb garden, and shallots and garlic, which still have in our root cellar. When we last made this recipe we used some pink-fleshed potatoes along with Yellow Finn and I think it made the casserole prettier.

We also lightly sautéed some rapini and garlic to eat with the gratin. It’s important not to cook the rapini for too long otherwise it will become bitter. While I love casseroles, I’m definitely looking forward to warmer weather and eating more spring vegetables. Since Persephone won’t be at the market until the summer, we’ll be shopping at other stands. And reporting in on what we make.

Links:


Tuesday, April 20, 2010

Crispy Cravings

As I was out running errands today I had a huge craving for McDonald’s. The more I eat healthy organic produce, the less and less I crave overly processed fast food. But today for, some reason, it just sounded so good. Then I thought about it for a little while and realized what I really was craving was some French fries. So I decided to bypass the drive-thru at the Golden Arches and make some fries when I got home.

We have a few Persephone potatoes from last season, so I sliced them up and heated up some olive oil in a small skillet. I’d made Mushroom Pecan Burgers from Moosewood’s New Classics cookbook for dinner last night and had a cooked patty ready to be heated up. I’d used Persephone onions and shallots for the veggie burger mix.

The Mushroom Pecan burgers taste nothing like beef burgers, but are delicious in their own right. The mushrooms are nice and earthy, and the pecans add a hint of toastiness. And with oatmeal and brown rice used to bind everything together, they’re also packed with fiber.

The Yellow Finn and rose-fleshed potatoes I used fried up beautifully. I sprinkled them with a bit of kosher salt after I took them out of the skillet. A little bit of work and I had a lunch that satisfied my craving and was much more healthful than a Big Mac and fries.

P.S. I've added an Amazon tab to my blog. If you want to purchase one of the cookbooks or kitchen tools I frequently use and mention, you'll have easy access to it. And I'll get a percentage of the sale. Win-win. 

Tuesday, March 23, 2010

Spring Forward

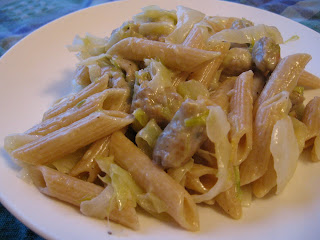
This Saturday was the first day of the 2010 Portland Farmers’ Market in the South Park Blocks. And the weather couldn’t have been more gorgeous. Trevor is back at the Persephone Farm stand and that means more fresh veggies for us. It is still a little early in the season, so all the Persephone greens were snapped up pretty quickly. But there were plenty of leeks and a few heads of cabbage, so I threw them in my market bag with a Lidia Bastianich recipe in mind: Whole Wheat Pasta with Sausage, Leeks and Fontina.
It’s a wonderfully flavorful vegetable-packed pasta dish. If you love pasta, but get tired of tomato sauce, give this a try. Leeks and shredded cabbage cook down to an almost silky texture. The sausage adds some heat and the whole-wheat pasta is really filling.
This recipe was published in Lidia’s Italian-American Kitchen and Cooking Light magazine. I’ve included the link to the Cooking Light version since it’s available. The recipe in her book calls for more olive oil and three links of sausage instead of one, and more cheese. I used the version in her cookbook and chose leaner turkey sausage instead of pork. Either way, the dish is delicious.


Links:
Whole Wheat Pasta with Sausage, Leeks and Fontina

Wednesday, March 10, 2010

Good Garnish


While I grew up in a Mexican-American family, Tortilla Soup was never on menu at my house. I first had it at the chain restaurant El Torito. And I’ve liked it ever since. I found a great recipe for it in the Los Angeles Times, but lost it years ago. So when I was craving a rich, steaming bowl of tortilla soup I had to develop my own recipe.

I know red bell peppers aren’t in season, but I was able to make good use of the Persephone Farm onions, shallot and garlic I had in the “root cellar.” Plus, I had some delicious corn tortillas freshly made at the Mexican bakery in my neighborhood. Nothing beats a good fresh corn tortilla. When I was little my dad would only eat tortillas from La Central bakery. Sometimes my Aunt Esther would make them at home and that was even better. So I never ate the pale imitations of corn tortillas sold at the grocery store until I was an adult and didn’t make the extra trip to the panadería. I’m so happy I live close to one now!

The ingredients that make this soup subtly smoky are the roasted red peppers, cumin and pimentón — a specialty Spanish paprika. It’s so flavorful you only need a little. Don’t try to swap it for regular paprika; it just won’t taste the same.

The fun of tortilla soup is the garnishes. I love to add Cotija cheese (a crumbly cow’s milk cheese) for the saltiness, avocado for it’s silky texture, tortilla chips for crunch, and cilantro for a hit of freshness. But you can play around and add other toppers such as sour cream or leftover roast chicken.


Tortilla Soup
Serves 6 or more

Soup
2 red bell peppers, roasted with blackened skin, seeds and stem removed (see link below for instructions)
3 tablespoons olive oil
2 cloves garlic, smashed
¼ cup shallot, chopped
1 cup red onion, chopped
1 cup yellow onion, chopped
1 bay leaf
1 teaspoon ground cumin
½ teaspoon dried oregano
¼ teaspoon pimentón, Spanish smoked paprika (I used sweet pimentón)
1 14.5-ounce can chopped tomatoes
6 cups homemade chicken stock
4 corn tortillas, torn into pieces

Optional garnishes
Cotija cheese, crumbled
Tortilla chips, store bought or homemade
Cilantro, chopped
Avocado, sliced
Sour cream

Heat olive oil in large stockpot or Dutch oven over medium heat. Add garlic, shallot, onions and bay leaf. Cook, stirring frequently until tender and lightly browned, about 10 minutes. Add cumin, oregano and pimentón, stirring for about 30 seconds. Add tomatoes, roasted red peppers and chicken stock. Bring to a boil. Stir in tortillas. Reduce heat to simmer. Simmer partially covered for 30 minutes.

Remove pot from heat. Fish out the bay leaf and discard. Allow to cool just slightly, and then use an immersion blender to blend soup until it is smooth. Return pot to heat to bring back to desired temperature.

Garnish each serving with your choice of toppings. Enjoy!

Links:
How to Roast Red Peppers

Wednesday, February 24, 2010

Eat Like the Irish


I spent a good part of my 20s frequenting an Irish pub walking distance from my apartment building. When it was that lean time right before paydays, my neighbor Kathy and I would scavenge in coat pockets, raid our laundry funds and check the couch for spare change so we could walk down for a pint of Harp or Newcastle, some live music and a chat with some Irishmen. As a result, I have an affinity for all things Irish.

With St. Patrick’s Day coming up (which was the only day of the year my neighbors and I ever ventured to English pub across the street), I was happy to find a fine Irish recipe for soda bread in this month’s issue of Cooking Light. This is a real thick, dense bread delicious slathered with butter. It has great texture from the steel-cut oats and whole-wheat flour. (I used locally milled Bob’s Red Mill flours.) It’s the kind of bread I picture Frank McCourt drooling for in the book Angela’s Ashes.

And even better, the issue contains a recipe for a Ploughman’s Lunch Platter. This was on the menu back at Irelands 32. Admittedly, the only time I really ate at Irelands was when my friends and I could talk Kevin the bartender/cook into making us “chips” after the kitchen was closed. But seeing the recipe made me want to try it with my freshly baked Brown Soda Bread.

The Ploughman’s Platter ended up being an economical use of odds and ends in the fridge. The recipe called for homemade tomato chutney. I swapped it for some mango chutney I had. (Even if you don’t make a platter I highly recommend eating the soda bread with Cheddar and chutney. It’s unbelievably good.) We almost always have sharp Cheddar on hand as well as some salad greens and pickles. I happened to have some chicken sausage in the freezer. You could always use a couple of hard-boiled eggs instead. It was a tasy and filling lunch. I can see why Irish wives fed this to their hungry farmer husbands. It’s cheap, healthy and fortifying.

Links:
Brown Soda Bread

Ploughman’s Lunch Platter

Saturday, February 20, 2010

Golden Bowl

Trevor and I first made Sheila Lukins’ Elegant Butternut Truffle Soup for Christmas 2004. We’d traveled east to spend the holidays with Trevor’s family and decided to make a feast with the help of his brother and sister. The soup was one of the dishes included in the “Extremely Merry Christmas” menu in Lukins’ Celebrate! cookbook. The other parts of meal included endive salad with Roquefort vinaigrette, a standing rib roast with horseradish cream, chanterelle risotto, Apple Brown Betty, and her wine suggestions Grand Cru Chablis and Pessac-Leognan. Lukins was right, it was an extremely Merry Christmas.

And the meal was a real group effort. Because we were flying in on Christmas Eve, Trevor’s parents bought all the groceries in Maryland and drove them up to Massachusetts in two large coolers. Trevor’s dad even made up menu cards that read “Denise and Trevor present Christmas dinner 2004 at Chez Carolyn” and listed the courses.

The butternut soup is the one recipe from that menu that I’ve made over and over. As soon as butternut squash is in season I remember this soup. It’s relatively simple to make (especially if you use an immersion blender instead of a food processor). So when I was down to my last butternut squash from Persephone Farm, I knew what to do with it.
I think what sets this soup apart from other butternut squash soups is the use of mace and the dab of truffle oil used to garnish. The unbelievable earthiness of the oil plays so well against the sweetness of the squash. Truffle oil can be tricky to find, but a gourmet shop, or well-stocked grocery store will have it. And it’s pricey, but a little goes a long way, and it adds extraordinary dimension to your dish.

And of course for me, each spoonful of this soup reminds me of that memorable evening.

Links:
Celebrate! by Sheila Lukins

Tuesday, January 26, 2010

New Favorite


Looking at the wealth of Persephone onions we had in the root cellar, i.e. garage, I knew I had to try out Mary Ann Esposito’s recipe for Roasted Onion Soup. The soup had a couple things going for it. One, when onions are slow-roasted they transform from bitingly sharp to sweet and mellow. And two, lots of red wine.

I followed the directions and oven roasted the assortment of red and yellow onions, leeks, and fresh thyme from my garden. Then added the two cups of red wine to the rimmed cookie sheet. The smell in my kitchen was heavenly. After most of the wine reduced, I added the onions to a soup pot with beef broth and few seasonings.

I did modify the recipe slightly. It called for each serving to be topped with a slice of bread, sprinkled with Parmesan cheese and broiled. I wasn’t sure my bowls could go in the broiler.  So I tossed some bread cubes I had stashed in the freezer with olive oil and a pinch of kosher salt and toasted them in the oven until they were golden and crunchy. Then I topped each bowl with the croutons and cheese. It definitely worked and the croutons added a nice crunch. This soup of very simple ingredients was incredibly savory and rich. I think it’s my new favorite.

Links:
Roasted Onion Soup


Tuesday, January 19, 2010

Freestyle


I used to experiment a lot in the kitchen, making up my own recipes. But Trevor kind of got me out of that habit. He used to be a strictly by the book cook. He’s loosened up a bit, so I now do a little more “freestyle” cooking.

I saw a couple of PBS cooking shows last year that featured stuffed winter squash: “Totally Vegetarian” and “Caprial and John’s Kitchen.” Both gave me the idea to try my own version. I used several ingredients I had on hand — onion, shallot and garlic from Persephone, prosciutto, pine nuts and Parmesan cheese.

The great thing about this dish is that you can really play around with this recipe. Try cooked quinoa, barley or millet instead of a wild rice blend. Nutty Gruyere or Asiagio cheese would be great instead of Parmesan. Use pecans or walnuts. Cooked crumbled Italian sausage would be delicious instead of prosciutto. Or omit the meat altogether and it’s a perfect vegetarian meal. Mushrooms would be a good addition, too. The idea is to use great winter flavors that work well together. Also it’s OK if your filling is a little salty because the sweetness of the cooked squash will balance it out.

Freestyle Stuffed Winter Squash
Serves 2 to 4


1 buttercup, acorn or kabocha squash, about 2 ¼ pounds
olive oil
kosher salt and black pepper
           
Filling
1 4 oz package of wild rice blend
1 tablespoon butter
1 small shallot, finely chopped
1 large onion, finely chopped
4 cloves of garlic, finely chopped
kosher salt
½ teaspoon each dried thyme and dried sage
olive oil
2 cups of chard, spinach or kale, thinly sliced
red pepper flakes
3 oz of thinly sliced prosciutto, chopped
3 tablespoons of toasted pine nuts
½ cup freshly grated Parmesan cheese, divided
1 tablespoon dry breadcrumbs (optional)

Sauce
½ cup white wine
¾ cup chicken or vegetable stock
2 tablespoons of butter

Preheat oven to 400˚ F.

Cut squash in half from stem to bottom to form two “bowls”. Scoop out seeds with a spoon. Slice off a small sliver from the bottom of the “bowls” so they will sit evenly on a cookie sheet. Place halves on rimmed cookie sheet and brush all sides with olive oil and season lightly with salt and black pepper. Bake for about 45 minutes, until the flesh is fork-tender in the thickest part.

While squash is in the oven, follow package directions for rice, omitting seasoning packet. Add a pinch of kosher salt instead.

In a large skillet, melt butter over medium heat. Add shallot, onion and garlic. Season lightly with salt. Cook 10 minutes until soft and slightly browned.  In the last minute of cooking add sage and thyme. Remove from pan and add to a large bowl. Put skillet back on heat and add a little olive oil. Add chard and a light sprinkle of red pepper flakes and salt. Cook until softened, about 4 minutes. Add chard to bowl with onion mixture. Put pan back on heat and add a little olive oil. Add prosciutto to pan and fry until crispy and brown. Add prosciutto to bowl.

When rice is done, add to bowl with other filling ingredients. Add pine nuts, ¼ cup Parmesan and bread crumbs. Mix together. Taste and season as needed with salt, black pepper and red pepper flakes.

In the same skillet you used to fry prosciutto, add wine and simmer until reduced by half. Add butter and stock, simmer until lightly reduced and thickened, adding salt if necessary.
Leave squash on the cookie sheet and stuff cooked squash halves with filling. (You may have a little filling leftover.) Top with ¼ cup Parmesan cheese. Place under broiler and broil until cheese is melted and lightly browned, 1 to 2 minutes at most.

For a very hungry person, one stuffed half is a good serving. But you can cut the half in half and it’s still a filling portion. Spoon sauce around squash on plate and enjoy!

Monday, January 18, 2010

Magical

The most amazing thing happened on Saturday. A huge bag of vegetables showed up unexpectedly on our doorstep. Our very own veggie fairy left us onions, cabbage, leeks, winter squash, potatoes, parsnips, farm-fresh eggs and what we think is a turnip. We are planning on putting this bounty to good use making Roasted Onion Soup, Stuffed Acorn Squash, Roasted Parsnip Bread Pudding and Butternut Truffle Soup. We made Moosewood’s Roasted Winter Vegetables last night in which the veggies are coated with a healthy dose of sage, thyme and olive oil and roasted in the oven. It was delicious.

And we had another magical food experience on Saturday night that also involved Persephone Farm. To celebrate our six-year anniversary Trevor and I went to Clarklewis, one of the restaurants that helped establish Portland as a foodie Mecca.

We went with the intention of really splurging. Every course was amazing. Even the bread and butter. Fleur de sel or some sort of specialty salt was sprinkled on the butter and it made every bite sing in my mouth. We ordered the cheese plate to start. Usually Trevor and I don’t like the same cheese, but we agreed each cheese was outstanding. I think my favorite was the Tasmanian blue cheese. But the Taleggio and cow-sheep blend cheeses were excellent. And the fried almonds.  And it was made even better with a glass of a slightly minerally, non-oaky Chardonnay.

Unfortunately they were out of the crab-stuffed endive salad, so I got a basic mixed greens with walnut salad. And Trevor tried the beet terrine salad that utilized Persephone beets. The thin layers of beet and cheese brought out the best of both ingredients.
Clarklewis sous chef Kai (hopefully I am spelling his name right) who is a regular customer at Persephone’s stand in the Farmers’ Market recognized Trevor and came out to greet us. Then he sent us a plate of gigantic gulf shrimp swimming in Meyer lemon sauce with pine nuts and a perfect dab of winter squash puree. I don’t even like shrimp and I scarfed it down. Trevor said, “This doesn’t even taste like shrimp, it tastes like lobster!”

Next up we had orecchiette with sausage-like meatballs and hedgehog mushrooms. The tender little ear-shaped pasta perfectly held the sauce. And the entreés did not disappoint. I had the double pork chop, which came with this wonderful corn cake that was a cross between cornbread and a soufflé. The savory center was like a custard. Trevor had the steak (topped with an outrageously good seasoned butter) and fingerling potatoes.
I protested when it came to dessert, but Trevor was determined. The kitchen was out of his first two choices, but the chocolate rum gelato was still a winner. I think we were in the restaurant for close to three hours! But it was perfect, the food, the ambience, the wine. Like I said. Magical.


Links:
Clarklewis restaurant

Moosewood Restaurant and Cookbooks
http://www.moosewoodrestaurant.com/

Wednesday, January 13, 2010

Nostalgia on a Cookie Sheet


I grew up baking with my Aunt Esther in my grandmother’s kitchen. We’d hang up a sign on the kitchen door reading “Ye Olde Bake Shoppe” and make something delicious. So I was a baker long before I became a serious cook.

My Grandma Lupe didn’t have much of a sweet tooth, except for her favorite: peanut butter cookies. She’d magically appear right before the first batch came out of the oven and sneak one off the cookie rack as they were cooling.

Not surprisingly, peanut butter cookies became my specialty. I always entered a variety of my baked goods at the Ventura County Fair and I won many ribbons. But I earned blue ribbons for peanut butter cookies a total of five times. For three years in a row I was unbeaten.

I had the Betty Crocker recipe memorized for a long time. Of course, I did a few minor tweaks to it to make the cookies softer and sweeter.

When I was baking peanut butter cookies this afternoon, all these memories swirled up as my Kitchen-Aid beat the butter and peanut butter together. Unfortunately I don’t remember the recipe by heart anymore. I had to go by the Joy of Cooking’s recipe, which is not bad. But at least I do remember my tweaks.

So no produce from Persephone Farm in this recipe, but I did use locally ground flour from Bob’s Red Mill. Better go make a sign to show the Bake Shoppe is open.

Links:
The Joy of Cooking
http://www.thejoykitchen.com

Bob’s Red Mill Flour
http://www.bobsredmill.com

Tuesday, January 5, 2010

Pork with Pork

If, like Samuel L. Jackson’s character in Pulp Fiction, you don’t “dig on swine,” I feel sorry for you. I’m with John Travolta’s character, “Pork chops are gooood. Bacon is goooood.”

The only better thing than pork, is pork with pork. As in pork scallopine Saltimbocca. It’s a boneless pork loin chop pounded good and thin, then topped with sage leaves and prosciutto. Yum. This is another Lidia Bastianch recipe. And one of our all-time favorites.  It’s the kind of meal that makes you want to clean off all the crap on the kitchen table, light some candles and use your good cloth napkins.

Lidia recommends pairing the scallopine with polenta, but I first made it with Parmesan mashed potatoes instead and have never looked back. We also sauté some spinach and garlic with olive oil as she recommends.

And it’s not too hard to prepare. The pork sautés quickly, and the tantalizing wine sauce just takes a few more minutes. For this meal, the potatoes take the longest. I do have one tip, though. If you are using frozen pork chops, made sure they are completely thawed before trying to pound them out. If they are still frozen in parts, you won’t be able to pound them evenly. You’ll have big hunks and then holes in other spots. Also, use the bumpy side of the tenderizer just for a few whacks, then switch to the smooth side to avoid getting holes in the meat.  But really this is a relatively easy meal that is fancy enough for company. But it’s great anywhere, anytime. We even made this on a camping trip once.

Links:
Lidia’s Italian-American Kitchen


Monday, January 4, 2010

Rhymes with pokey

We’re heading into the bleak season for locavores. The PSU Farmers’ Market is closed until spring and opportunities for getting local food are fewer and far between. But I’m thankful for two things. 1. The Hillsdale Farmers’ Market is open two Sundays a month until May and 2. Trevor’s early Christmas present to me: a burlap sack filled with Persephone Farm potatoes, onions, shallots and a few winter squash.

We will be eating a lot of potatoes this winter. But when it’s cold and gray outside, steaming potatoes in just about any presentation are so filling and warm. One of the best uses for all these potatoes is gnocchi. We get our Potato Gnocchi recipe from Lidia Bastianch’s Lidia’s Italian-American Cookbook. I think I’ve mentioned how Trevor and I had a love-hate relationship with this book when we first started cooking with it. Well it’s now changed to a walking-around-in-a-daze, almost-too-infatuated-to-eat, straight-up love relationship.

But the first time we made gnocchi, I think I was cursing Lidia’s name. Our first ill-fated, gnocchi-making adventure lasted about six hours. By the time we were finished, the kitchen was covered in tomato sauce, and Trevor had sustained a deep gash in his hand and had bled all over his shoes. It’s really a testament to the strength of our relationship that we remained married after that ordeal. And somehow we decided it’d be a good idea to make gnocchi again.


To be fair, our main frustration in making the recipe that first time is that we didn’t know what was (or have) a potato ricer. I had a vague idea, and Trevor attempted to fashion one from a can — hence blood-covered shoes. A potato ricer looks like a giant garlic press. Peeled, hot boiled potatoes are squished through it and fluffy little strands of potatoes come out. Another key to good gnocchi is making sure the potatoes are completely cool after they are riced.

And getting the right amount of flour can be tricky. I’ve learned with this recipe to measure out 2 cups of flour, set a timer for 10 minutes and then slowly fold/knead in the flour a little at a time until the time is up or almost up. The dough shouldn’t be too sticky or too dry. The only way to really learn how to get it right is to make the gnocchi a few times.

Happily, today we are gnocchi pros. It’s still time-consuming (more like two hours instead of six), but we put the extra gnocchi in the freezer and have many more meals that take only as long as it takes to boil water and heat up sauce.
Usually we have Lidia’s tomato sauce with the gnocchi, but a few weeks ago we decided to try her Gorgonzola Sauce, also in her Italian-American cookbook. It took our gnocchi to a whole new level. Of course, how could a sauce with butter, two cheeses and cream not be heavenly? Especially with Rogue Creamery’s Oregonzola cheese. It was like the best mac and cheese you’ve ever had in your life. I highly recommend it for your must-try list.

Links:
Lidia’s Italian-American Cookbook
Oregonzola cheese